
 AI photo
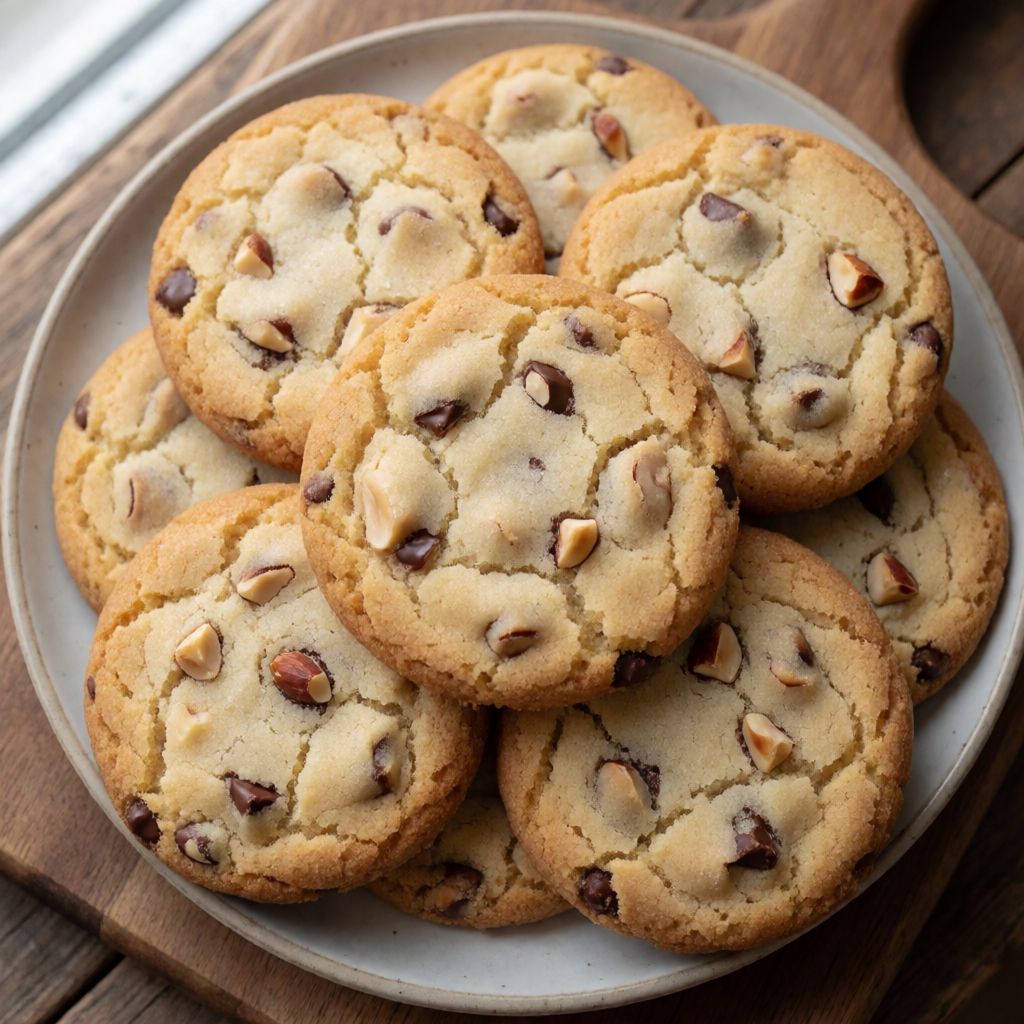
Hazelnut and Chocolate Cookies
Crunchy hazelnut and dark chocolate cookies finished with a sprinkle of flaky salt.
Labels are worked out automatically from the ingredients and can be wrong. Check the packaging if it matters to you.
Ingredients
- 150 g Butter room temperature
- 100 g Sugar
- 100 g Brown sugar
- 1 pcs Egg
- 225 g Flour
- 1 tsp Baking powder
- ½ tsp Vanilla sugar
- 1 pinch Salt
- 180 g Hazelnuts
- 130 g Dark chocolate finely chopped
- ½ tsp Salt for sprinkling







Steps
Beat the butter, sugar and brown sugar until light and fluffy, then beat in the egg.
4 minMix the flour, baking powder, vanilla sugar and salt, sift into the dough and mix well until no streaks of flour remain.
2 minToast the hazelnuts in a dry, hot pan until the skins start to crack.
3 minWrap the nuts in a clean cloth and rub to remove the skins. Chop the nuts so that about two-thirds are finely chopped and the rest coarsely chopped. Add the nuts and chocolate to the dough.
Shape small balls about the size of a hazelnut in its shell and place on a baking tray lined with parchment paper. Press the cookies gently to flatten slightly. Sprinkle with a little flaky salt.
Bake in a preheated oven at 180°C (fan) for 11-14 minutes until golden and crisp. Let cool on a wire rack.
13 min
What was changed
The oven temperature was rounded to the nearest display step .
This is a drop cookie — forty small ones from one bowl, built to have a crisp edge and a soft, barely-set middle, with the hazelnut doing structure and the chocolate doing contrast. Nothing here is complicated, but three things decide whether it's a good biscuit or a flat, sandy one: how you cream the butter, how you toast the nuts, and when exactly you take the tray out.
Creaming isn't decoration, it's physics. Butter at a true room temperature — soft enough to dent with a finger, not greasy, not melting — lets the sharp edges of sugar crystals cut thousands of tiny air pockets into the fat. Those pockets are what the baking powder expands later. Cold butter won't let the sugar in; it just grinds against it, and you get a dense, pale, slightly oily dough that bakes flat. Melted butter loses the air before it's even trapped — same result from the other direction. Watch for pale and fluffy, not four minutes on a clock.
Some say brown sugar is there to make the biscuit "a bit healthier" than white. No — it's there because molasses holds onto water. White sugar at the edges, where the heat is fiercest, caramelises and dries into crispness; the molasses in the brown sugar, concentrated more towards the centre, keeps that same spot from drying out at the same rate. One dough, two textures, by design.
Butter is the fat and the flavour both; nothing else gives this particular smell when it browns slightly at the edges. If you must substitute, any fat solid at fridge temperature and soft at hand-warmth will hold the structure — margarine, say — but you lose the flavour that's half the reason to make these.
The two sugars aren't interchangeable, they're a pair doing different jobs — white for the crisp shell, brown for the chew, as above. If you've only got white sugar in the house, stir a teaspoon of golden syrup or treacle into it before you start; that's the moisture you're borrowing from the brown sugar's molasses.
Egg binds the fat and the flour together and brings the last bit of moisture the dough needs. UK eggs vary — a small one can leave the dough slightly dry and stiff to roll into balls; if that happens, a teaspoon of milk fixes it, no drama.
Flour and baking powder are the scaffolding. Mix them in only until the streaks disappear and then stop — every extra turn of the spoon after that develops gluten, which is what you want in bread and don't want here; keep going and the biscuit turns chewy in the wrong, tough way rather than the soft way the brown sugar is aiming for. The baking powder needs both heat and moisture to release its gas, which is why it only does its work in the oven, giving you that faint crackle on top rather than a dome.
Vanilla sugar is just sugar that's spent time next to a vanilla pod — not something you'll easily find on a UK shelf. A few drops of vanilla extract does exactly the same job; you're not losing anything by swapping.
Salt appears twice and for two different reasons. The pinch inside the dough isn't there to taste salty — it rounds off the sweetness so the sugar doesn't sit flat on the tongue. The salt on top is there precisely to taste salty, in flakes, so it stays as distinct crunchy crystals against the melted chocolate rather than dissolving into the dough the way table salt would.
Hazelnuts get toasted for a reason beyond flavour — the dry heat drives moisture out from between the nut and its skin, which is what makes the skin crack and let go; rubbing it off in a cloth is just friction finishing what the heat started, nothing mysterious about it. Some say you can skip this and buy ready-skinned, pre-roasted nuts to save the step — no, because roasted nuts lose their aromatic oils sitting on a shelf for weeks; toasting your own, right before they go into the dough, is what actually gets you the smell. Chop two-thirds of them fine and leave a third coarse on purpose: the fine chop spreads nut flavour through every bite, the coarse chop gives you something to actually bite into, so the cookie doesn't read as just crumb.
For the chocolate, chop a bar yourself rather than buying chips — bar chocolate melts into uneven pools and streaks through the dough, which is what you want; chips are engineered with stabilisers specifically to hold their shape and not melt, which is the opposite of what you're after here. Look for something in the 60–70% range — dark enough to argue back against the sugar, not sweet enough to disappear into it. Milk chocolate will make the whole thing read as simply "a sweet biscuit," losing the one bit of bitterness that was doing real work.
A fan oven at 180°C runs hotter and drier than a non-fan oven at the same number, and your particular oven's dial is probably lying to you by ten degrees in one direction or another — ovens almost always are. So treat the given minutes as the earliest point to start checking, not a deadline, and trust the gold-at-the-edge, soft-in-the-middle look over the clock. And give the biscuits the few minutes they need sitting untouched on the rack once out — that's patience doing the last bit of the job the oven started, letting the middle finish setting without turning into something hard all the way through.