
 AI photo
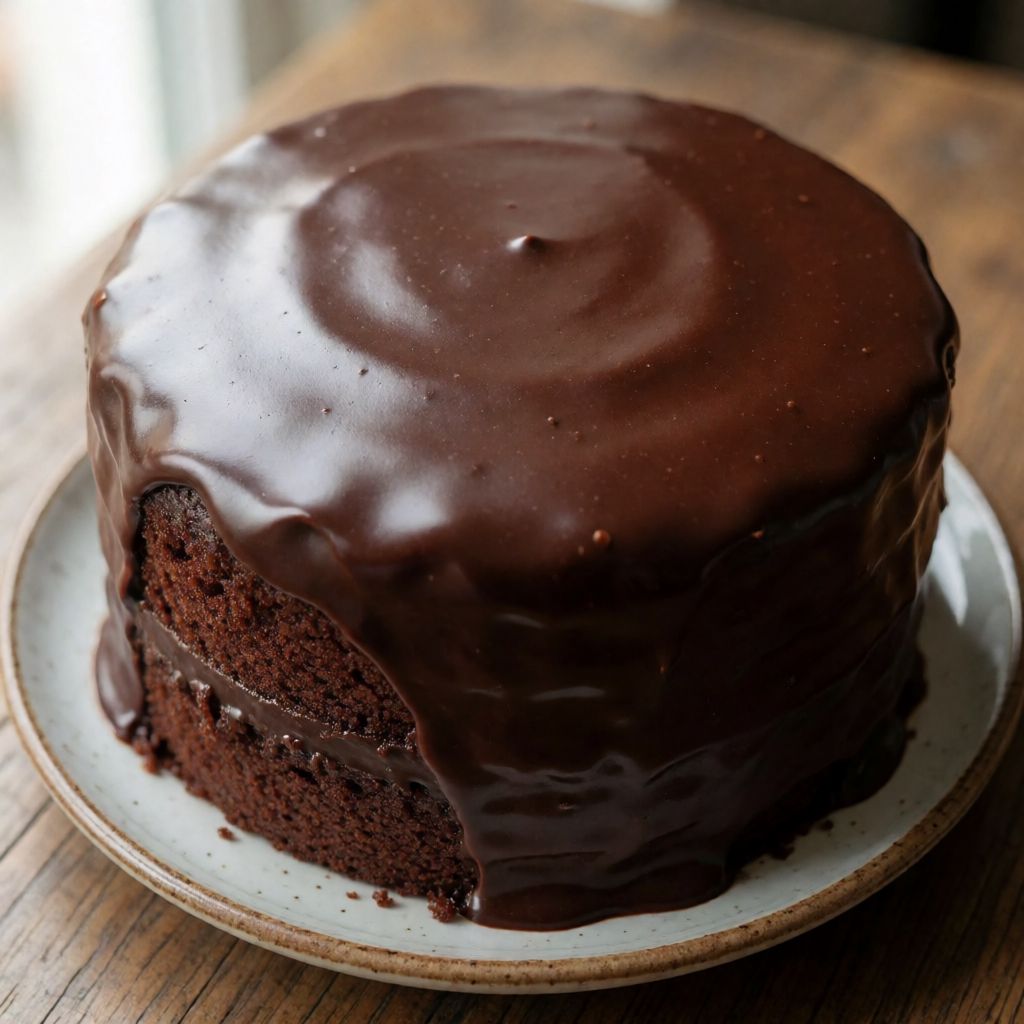
Chocolate Birthday Cake
A rich three-layer chocolate birthday cake with milk chocolate mousse and dark chocolate ganache.
Labels are worked out automatically from the ingredients and can be wrong. Check the packaging if it matters to you.
Ingredients
- 6 pcs Eggs
- 160 g Sugar
- 150 g Dark chocolate
- 140 g Butter
- 120 g Plain flour
- 8 g Baking powder
- 300 g Milk chocolate
- 500 ml Double cream
- 120 g Dark chocolate
- 70 ml Double cream
- 35 g Sugar
- Milk as needed
- Cocoa biscuits to taste
- Sugar flowers to taste





Steps
Cut the dark chocolate into pieces, add it to the butter and melt together over a bain-marie or in the microwave.
Let the mixture cool completely.
In a large bowl, beat the egg yolks with the sugar using an electric mixer until light and creamy.
Add the chocolate mixture and mix well.
Sift in the flour and baking powder and fold through.
Separately whip the egg whites to a stiff foam and gently fold them into the batter.
Pour the batter into a 22 cm cake tin, greased with butter and dusted with flour.
Bake at 170°C for 55–60 minutes in a fan oven, or at 180°C for 60–65 minutes in a conventional oven.
60 minOnce baked, let the sponge cool completely.
Bring 150 ml of double cream to the boil, add the chopped milk chocolate and melt into a smooth, even ganache.
Let the ganache cool completely.
Whip the remaining cream with an electric mixer, add the cooled milk chocolate ganache and fold gently together.
Pour the cream into a saucepan, add the sugar and bring to the boil.
Add the chopped dark chocolate and stir until fully melted.
Let the ganache cool completely.
Cut the cooled sponge into three layers using a serrated knife.
Place the first layer on a serving plate and brush with a little milk.
Using a spatula, spread some of the milk chocolate mousse over the whole surface of the first layer.
Cover with the second layer and repeat the milk brushing and mousse spreading.
Finish with the last layer and brush with milk again.
Slide strips of baking paper under the cake and coat the sides with mousse so the cocoa biscuits will stick.
Carefully remove the baking paper along with any excess crumbs.
Transfer the remaining mousse and ganache into two piping bags for decoration.
Decorate the top of the cake using the piping bags and the sugar flowers.
Keep refrigerated until serving.
This is a flourless-leaning chocolate sponge, three layers deep, held together with a milk chocolate mousse and finished with a dark chocolate ganache — the kind of cake that looks like it came from a patisserie window but is really just three separate, forgiving techniques stacked on top of each other. What decides whether it works isn't the oven, it's the cooling. Every single component in this cake — melted chocolate and butter, milk ganache, dark ganache — has to come down to room temperature or below before it meets the next thing. Skip that and you get a split mousse or a sponge that collapses under warm, runny cream. Patience is the actual ingredient here, more than the chocolate.
The sponge itself is a genre worth naming: it has almost no flour relative to its eggs and chocolate — 120g flour against six eggs — so it behaves more like a dense chocolate soufflé that's been civilised into a cake. The structure comes from whipped egg whites and whipped yolks, not from gluten. That's why you fold rather than stir once the whites go in: stirring knocks the air back out, and the air is the only thing lifting this sponge, since there's barely any flour to do it with scaffolding.
Some say a chocolate cake must be dense and fudgy to be "proper" chocolate cake — no, because density and chocolate flavour aren't the same thing. This sponge is light specifically so the heavy mousse and ganache have something to contrast against. A dense cake with a dense filling just becomes a wall of brown sameness in the mouth.
Start with the eggs, because the whole sponge depends on separating what they do. Yolks carry fat and richness and help emulsify the melted chocolate-butter mixture into the batter smoothly — that's why they go in first, beaten pale with the sugar, so the sugar partly dissolves and the mixture lightens in colour, a sign it's actually aerated and not just stirred. Whites, beaten separately to a stiff foam, are pure lift. Folding them in last and gently is non-negotiable: any vigorous mixing here deflates the one source of rise you have, since 8g of baking powder on 120g flour is doing modest work, not heavy lifting.
Dark chocolate and butter melted together is a classic pairing because butter is mostly fat with a little water, and that water is what can make melted chocolate seize if you're not careful — doing it over a bain-marie or gently in the microwave, in short bursts, avoids that. Any dark chocolate with 60-70% cocoa works; anything much higher and the cake turns bitter rather than rich, since there's no extra sugar built in to compensate. Letting this mixture cool completely before it meets the egg yolks matters for a plain reason: hot chocolate-butter poured onto yolks will start cooking them, giving you flecks of scrambled egg in your cake batter rather than a smooth one.
The milk chocolate mousse (300g milk chocolate, 500ml cream used two ways) works through a basic ganache-into-whipped-cream trick. You make a ganache first with part of the cream brought to the boil — boiling, not simmering, because you need enough heat to melt 300g of chocolate through fully, not just soften the surface — then you fold that cooled ganache into cream whipped separately. If you fold it in while it's still warm, it'll melt the air pockets in the whipped cream and you'll get a runny mousse that won't hold between sponge layers. Milk chocolate specifically because it's softer-set and has enough sugar already that this layer doesn't need extra — any milk chocolate above about 30% cocoa solids will set properly; cheaper ones with more vegetable fat than cocoa butter can stay greasy and never firm up.
The dark ganache (120g dark chocolate, 70ml cream, 35g sugar) is more concentrated — less cream relative to chocolate — because it doesn't need whipping into anything, it needs to hold its shape coming out of a piping bag and sit glossy on top. The added sugar here is doing a different job than in the mousse: it's balancing the higher cocoa percentage of straight dark chocolate so the top decoration doesn't taste sharply bitter against the sweeter layers underneath.
The milk brushed between layers isn't decoration, it's moisture insurance. A sponge this light, cut into three thin layers, dries out fast at the cut surfaces — brushing with milk (any kind, whatever's in the fridge for your tea works fine) stops the exposed crumb from drinking moisture out of the mousse instead, which is what makes a cake taste dry by day two even though the sponge itself was fine on day one.
Cocoa biscuits pressed onto the sides, held up by strips of baking paper slid underneath, solve a real domestic problem: in a kazan-less, standard UK kitchen you've no cake-decorating turntable and no steady hand for perfectly smooth sides. The biscuits hide any unevenness in the mousse coating and give you something to hold onto structurally while it sets in the fridge. Any dry, crisp biscuit with a cocoa or plain flavour that won't go soggy fast will do — digestives work if that's what's in the cupboard, though they'll read sweeter than a proper cocoa biscuit.
Keep it refrigerated until serving, and that's not caution for its own sake — the mousse is whipped cream at heart, and whipped cream softens and slumps at room temperature within an hour or two. This is a cake that holds its three-layer shape because it's cold, not because it's structurally bulletproof. Pull it out shortly before cutting, not the moment guests arrive.